A Winter Garden Walk: Five Things to Notice Before Spring
A winter garden walk reveals five useful clues about plant supports, paths, containers, fallen debris and access, so you can plan spring work without rushing into chores.
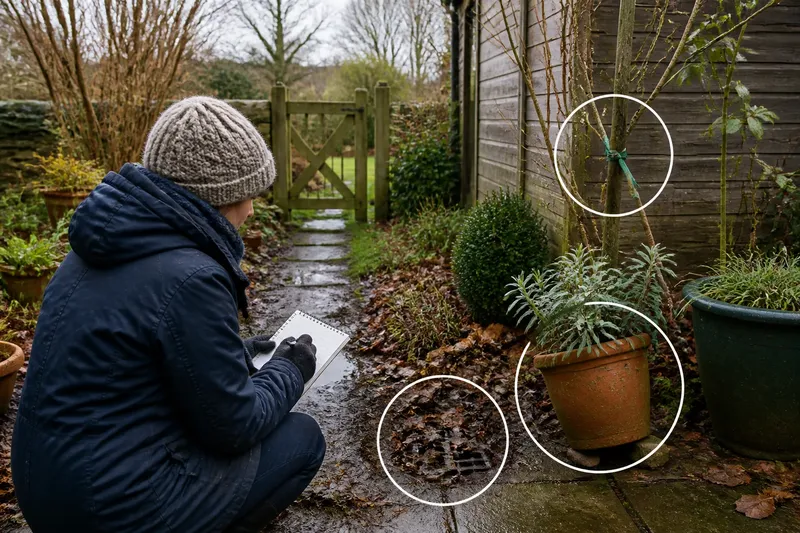
The usual mistake on a winter garden walk is bringing secateurs and treating every untidy corner as a job. The cost is a hurried visit, unnecessary cutting and notes too vague to guide later work. Leave tools in the shed and inspect five things instead.
Bare stems reveal structure, wet ground shows where water travels, and fallen leaves mark where wind leaves its evidence. Take a notebook or your phone. The aim is to record conditions, not to make the garden look finished.
Check plant structure and supports
Look at shrubs, climbers, herbaceous plants and small trees as they stand. Note stems leaning into a path, branches rubbing, or supports that have shifted. A plant may look sparse without being damaged, so appearance alone is not a reason to prune.
Record what is visible separately from what you suspect. “Split stem beside the gate” is an observation; “shrub is too large” is a judgement to revisit when leaves return. Check ties and stakes for movement or pressure against stems, but leave adjustments for a suitable time.
Trace the route people actually use
Look for worn shortcuts, slippery paving, muddy patches and places where plants narrow a path. Consider whether the route is easy to use for reaching beds or moving a wheelbarrow. Note the exact spot and the conditions rather than deciding on a repair from one wet afternoon.
Say you see a muddy strip between the compost area and a raised bed after rain, where feet cut across the lawn. Write down the route and weather, then observe whether the strip recurs. If it does, the spring decision may be to change the route or its surface; if it does not, a temporary patch may need no work.
Inspect container position and exposure
Notice pots that lean on uneven ground, saucers blown aside, or plants sitting in a draught between a wall and gate. Check whether rain can reach them or an overhang keeps the compost dry. A visible tilt or repeated surface dryness is more useful to record than a general impression that a pot looks exposed.
Do not assume that every pot needs moving. The plant, container material and drainage all matter. Note the position and condition first, then assess whether a change would suit that plant. It is not worth rearranging an entire collection simply because one pot looks lonely.
Follow leaves and small branches to their stopping places
Notice where fallen material gathers: against a fence, at a path corner, around a drain cover or beneath a hedge. A recurring pile may explain a slippery route or conceal something that needs checking. Ordinary leaf cover that blocks neither access nor inspection can be left alone.
Raking every leaf into a spotless outline is not worth the effort on an inspection walk. It removes clues about wind and shelter and turns observation into tidying. Record troublesome accumulations and decide later whether they affect access or hide a drain.
Check where access or inspection is obstructed
Look for places where a gate is difficult to reach, a drain cover is hidden, or crowded pots prevent you from seeing drainage holes. This is distinct from the condition of the path itself: the question is whether you can reach and inspect the feature safely and clearly.
Write a location and a visible obstruction, such as “pots beside the back wall block the drain cover”. If the cover remains accessible, no rearrangement is needed; if it is obscured, plan a small change that restores access rather than moving everything.
Keep the five observations useful for spring
Use a simple record for each item: where it is, what you saw, the conditions, and what decision follows. This keeps a note such as “north side of shed, leaves over drain cover after wind” more useful than “drainage bad”. A photograph should include a recognisable reference such as a gatepost or path edge.
- Plant structure: Check for a split stem, rubbing branch or leaning growth. If damage is clearly visible, mark the plant for a suitable follow-up; if it is only sparse-looking, wait to reassess before pruning.
- Supports and ties: Check whether a stake has shifted or a tie presses against a stem. If either is evident, note the plant and plan a careful adjustment; if the support is stable and clear of the stem, leave it alone.
- Paths: Check for a recurring muddy strip, slippery leaves or a narrowing route. If the same obstruction affects access, consider a route or surface change; if it appears only in unusual weather, revisit before committing to work.
- Containers: Check for a tilted pot, displaced saucer or exposure to wind and rain. If the position causes a visible problem, review a better place for that plant; if no problem is apparent, keep the pot where it is.
- Fallen material: Check where leaves and branches collect and whether they cover a path or drain. If access or inspection is blocked, plan to clear that spot; if the material is harmless cover, leave it in place.
- Access: Check whether gates, drain covers and pot drainage holes can be reached and seen. If an item is obstructed, plan the smallest change that restores access; if it is clear, do not add a job for its own sake.
Imagine a gardener notes three conditions: a tie rubbing a stem beside the shed, leaves covering the drain after windy weather, and a pot that rocks on uneven paving. The actual next steps are to mark the tie for careful review, check whether the leaves block access, and assess a level position suitable for the plant. If the drain is clear beneath the leaves, no clearing job follows; if the pot still rocks when checked on a calmer day, repositioning becomes the practical choice. The result is three decisions based on observable conditions, not three automatic chores.
What should a winter garden walk answer?
When is a useful time to inspect the garden?
Choose a day when you can see the ground and move safely. A visit after rain can reveal water and debris patterns, while a drier visit may make path surfaces and pot positions easier to assess.
Should I prune during the walk?
Keep the visit observational unless you already know the plant and the work suits the conditions. Note damaged or awkward growth for later review rather than cutting on appearance alone.
What should I write in my notes?
Record the location, visible condition and question it raises. “Gate path narrows where the climber leans” gives you a specific point to check again.
How do I turn observations into spring work?
Revisit each note and confirm that the condition still matters before assigning a task. If the obstruction or damage remains, plan a proportionate response; if it has gone or proves harmless, cross it off.
Choose only the notes that point to a decision
At the end of the walk, select observations that affect access, plant support, container position, drainage inspection or safe movement. Leave mere untidiness on the page. A winter garden is allowed to look as though it has been outside.
Keep the winter garden walk notes specific enough to check again: “Does this path still hold water after a dry spell?” or “Is this tie rubbing the stem?” Rechecking the same place gives you a sounder basis for spring work, and sometimes the useful decision is to do nothing.